Selling add-ons with sub-products
Most products eventually pick up add-ons: a pro tier, an expansion pack, an optional module. In Moonbase they're sub-products, which your app unlocks, counts per computer, lets customers try and sells, all through the main product's license.
Written By Tobias Lønnerød Madsen
This guide walks through what a sub-product is, when to reach for one, how to set one up in the dashboard, and how your product can tell which sub-products a customer may use. It also covers including an add-on in the main product's license, which gives the add-on seats per computer and trials your app can start, and how your app can sell add-ons from inside itself.
What is a sub-product?
A sub-product is a regular Moonbase product that sits underneath a parent product. Its product ID uses a dotted format: parent-id.child-id. For example, a product called acme-studio might have these sub-products:
acme-studio.pro-toolsacme-studio.cloud-syncacme-studio.extra-workspace
Each sub-product is a first-class product. It has its own name, description, pricing, currencies, visibility settings and licenses. A customer can own any combination of them: buying pro-tools doesn't require buying cloud-sync, and vice versa. The parent product is what your integration activates and validates; the sub-products come along with the parent's license, so your product learns which extras the customer has without checking a license for each one.
Sub-products vs. pricing variations vs. bundles
Three concepts get mixed up a lot. Quick rule of thumb:
Sub-product: A separately purchasable add-on that extends a parent product. Use this for expansion packs, pro tiers, feature unlocks, optional modules, premium content. This article is about these.
Pricing variation: A different way to buy the same product (one-time vs. subscription, Standard vs. Pro tier on a single SKU, monthly vs. yearly). Use variations when the thing being sold is the same, but the terms differ.
Bundle: A grouping of multiple independent products sold together at a combined price. Use a bundle when you want to package, say, three separate products into one purchase.
If your customer is buying more of the same product, that's a variation. If they're buying an extension to a product you already sell them, that's a sub-product. If they're buying several different products in one go, that's a bundle.
Walkthrough: create a sub-product
Step 1: Open the new product dialog
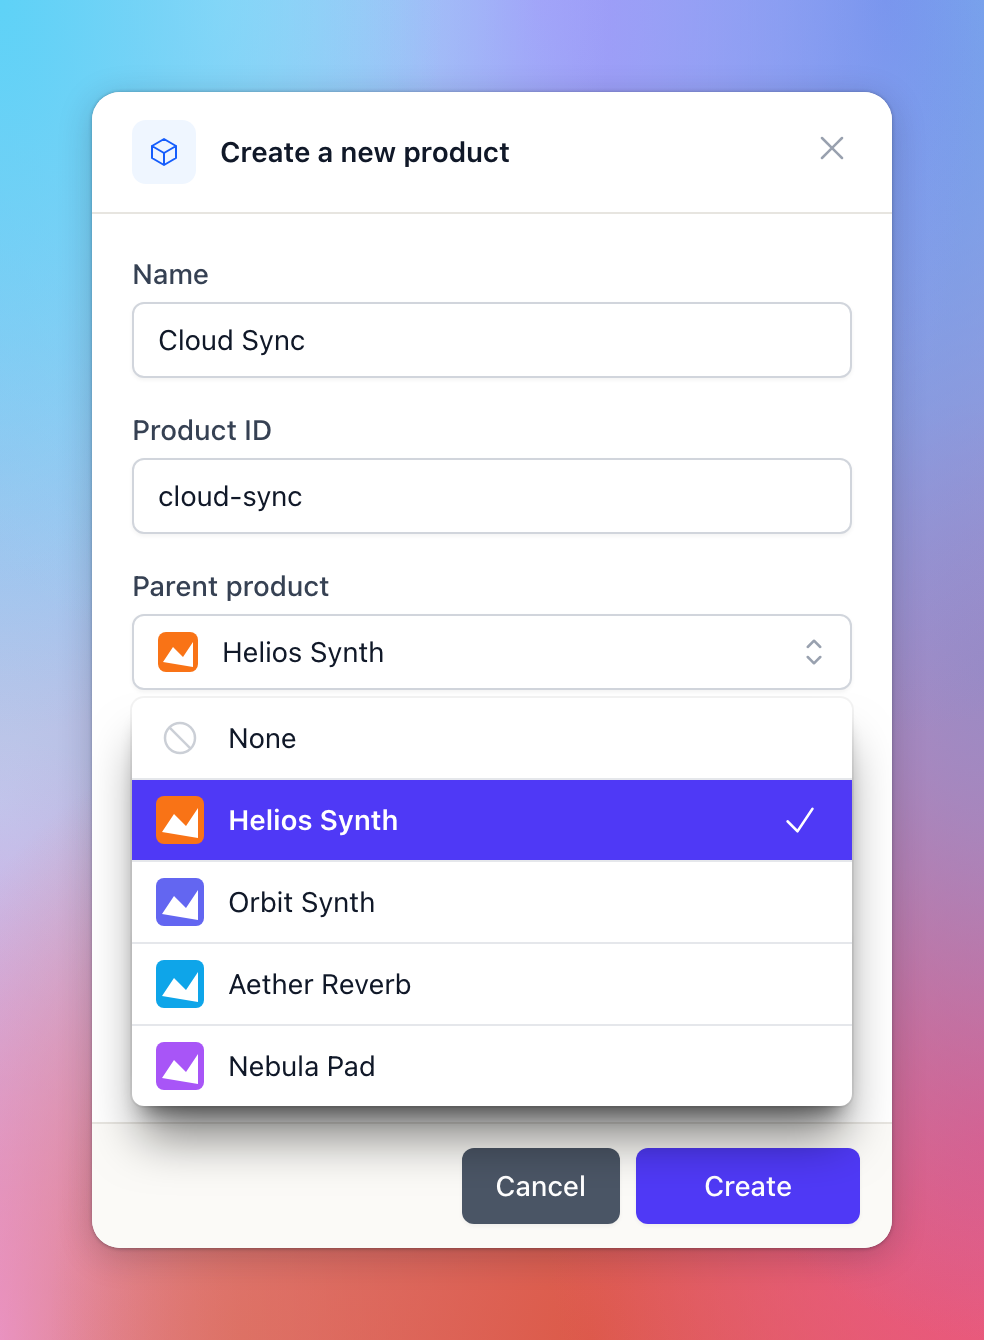
In the dashboard, go to Products and click New product. The Create a new product dialog is the same one you used for your parent product, with one field you'll use here: Parent product.
Step 2: Fill in the details
Name: What customers will see. Treat it like a real product name: "Pro Tools", "Extra Workspace", "Cloud Sync".
Product ID: Lowercase, dashes allowed, no spaces. You only type the child portion (e.g.
pro-tools). Moonbase combines it with the parent ID for you, so the final ID becomes something likeacme-studio.pro-tools.Parent product: Pick the parent product from the dropdown. Only top-level products show up here; sub-products can't be nested under other sub-products.
Tagline and Description: Same as any product. Worth writing proper copy here even if the sub-product is invisible to the customer outside your product, because these may be shown on the storefront, in the cart, in receipts, and in your app's list of add-ons.
Click Create.
Step 3: Configure pricing and visibility
After creation you'll land on the sub-product's own edit page. From here it behaves exactly like a normal product:
Add a pricing variation under Pricing with a price in each currency you sell in.
Under Basic Details, set Customer visibility to fit the add-on:
Default visibility is fine for most sub-products customers should clearly see in their account (e.g. an add-on they purchased).
Choose Never if the sub-product should only manifest through your product and shouldn't show up as a standalone item in the customer's inventory. Handy for pure feature flags.
Step 4: Put it on sale and test
A new product isn't for sale yet: once it has a pricing variation, switch on Product is purchasable in the Pricing section and click Save. Run a test purchase the same way you'd test any product, then re-validate the parent product's license in your integration. You should see the new sub-product appear in the license token (see below).
Step 5: Decide how it's licensed
By default, an add-on works like a flag on the parent's license: your product sees that the customer owns it, and unlocks it on every computer the parent runs on. That suits sample packs, presets and feature unlocks. To count the add-on per computer, or to let customers try it from inside your app, include it in the main product's license, described next.
Including an add-on in the main product's license
Every add-on has a license of its own, with its own number of activations. When you include the add-on in the main product's license, that license puts its seats to work:
Seats follow the main product. When a computer activates the parent product, it also takes a seat of each included add-on the customer owns, on the add-on's own license. So the add-on's Number of activations per license decides how many of the customer's computers can use it.
One license check for both. The parent's license says, for each included add-on, whether your app may unlock it on this computer, and until when.
Trials from inside your app. Your app can start the add-on's trial from the parent's license, with nothing for the customer to download or activate.
Turning it on
Open the add-on's product page and go to its Licensing section.
Turn on Include in the main product's license. It only shows on add-ons.
Check Number of activations per license. Every computer that activates the parent takes one seat of the add-on, so give it at least as many as the parent, unless you want the add-on on fewer computers.
Click Save.
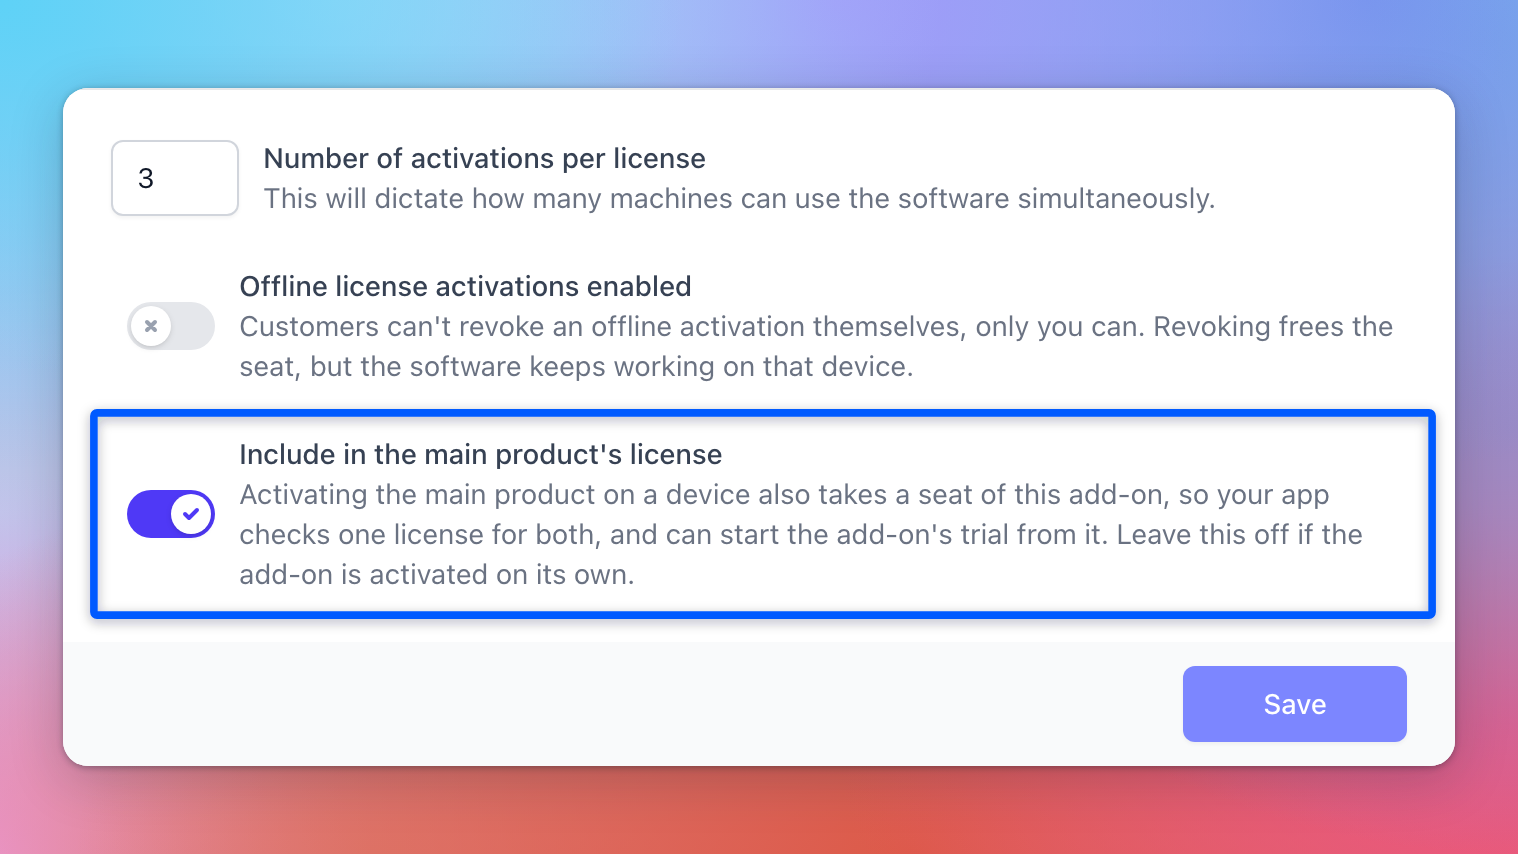
Nobody has to activate anything again. Computers already running the parent take their add-on seats the next time your app validates its license, and so does a computer whose customer buys the add-on later. If you raise the add-on's number of activations, use Actions > Update license entitlements in its Licensing section to give licenses already issued the new number.
Leave it off for an add-on that is activated on its own, for example a separate iOS app you sell as an add-on to your desktop app. Included, it would take a seat on every computer that runs the main product.
Letting customers try an add-on
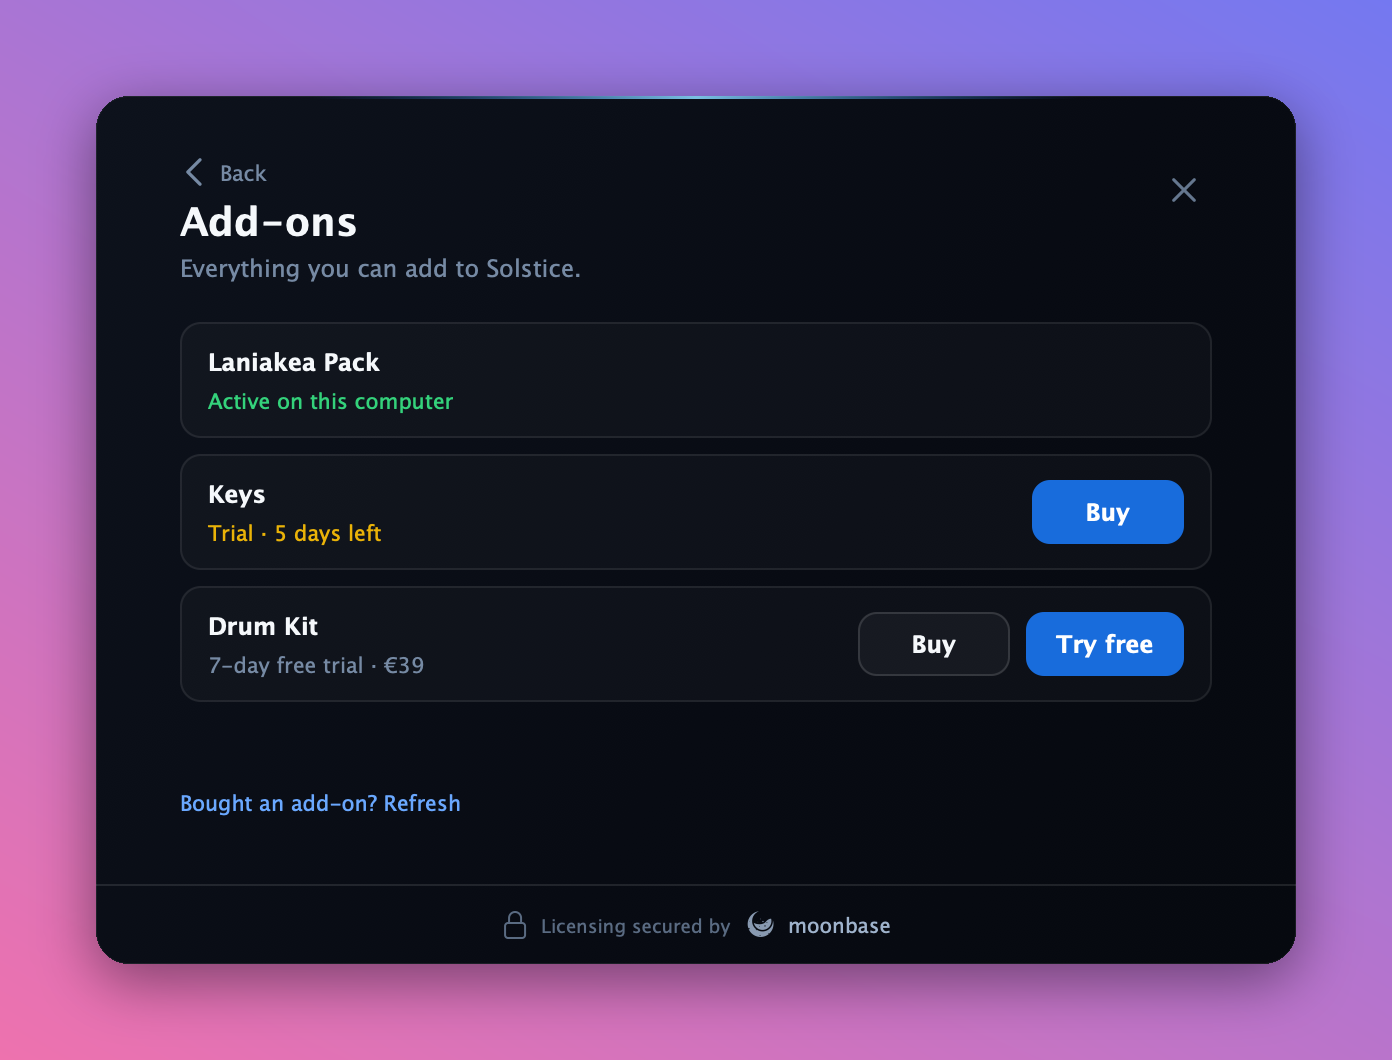
To offer a trial of an included add-on, turn on Trials enabled in the add-on's Trials section, as for any product (see Trials). Your app can then start the trial from the parent's license, for example from a Try free button next to a locked feature.
The trial follows the add-on's own settings: Number of days per trial, Trials never expire and Require newsletter opt-in.
It shows in the add-on's Trials list, and each computer gets one trial of each add-on.
It starts only from a full license of the parent, activated online. A customer who is trying the parent itself, or using an offline license, can't try its add-ons.
A customer who already owns the add-on gets a seat instead. One who buys the add-on during the trial gets a seat the next time the app validates its license, in place of the trial.
Add-on seats on a license
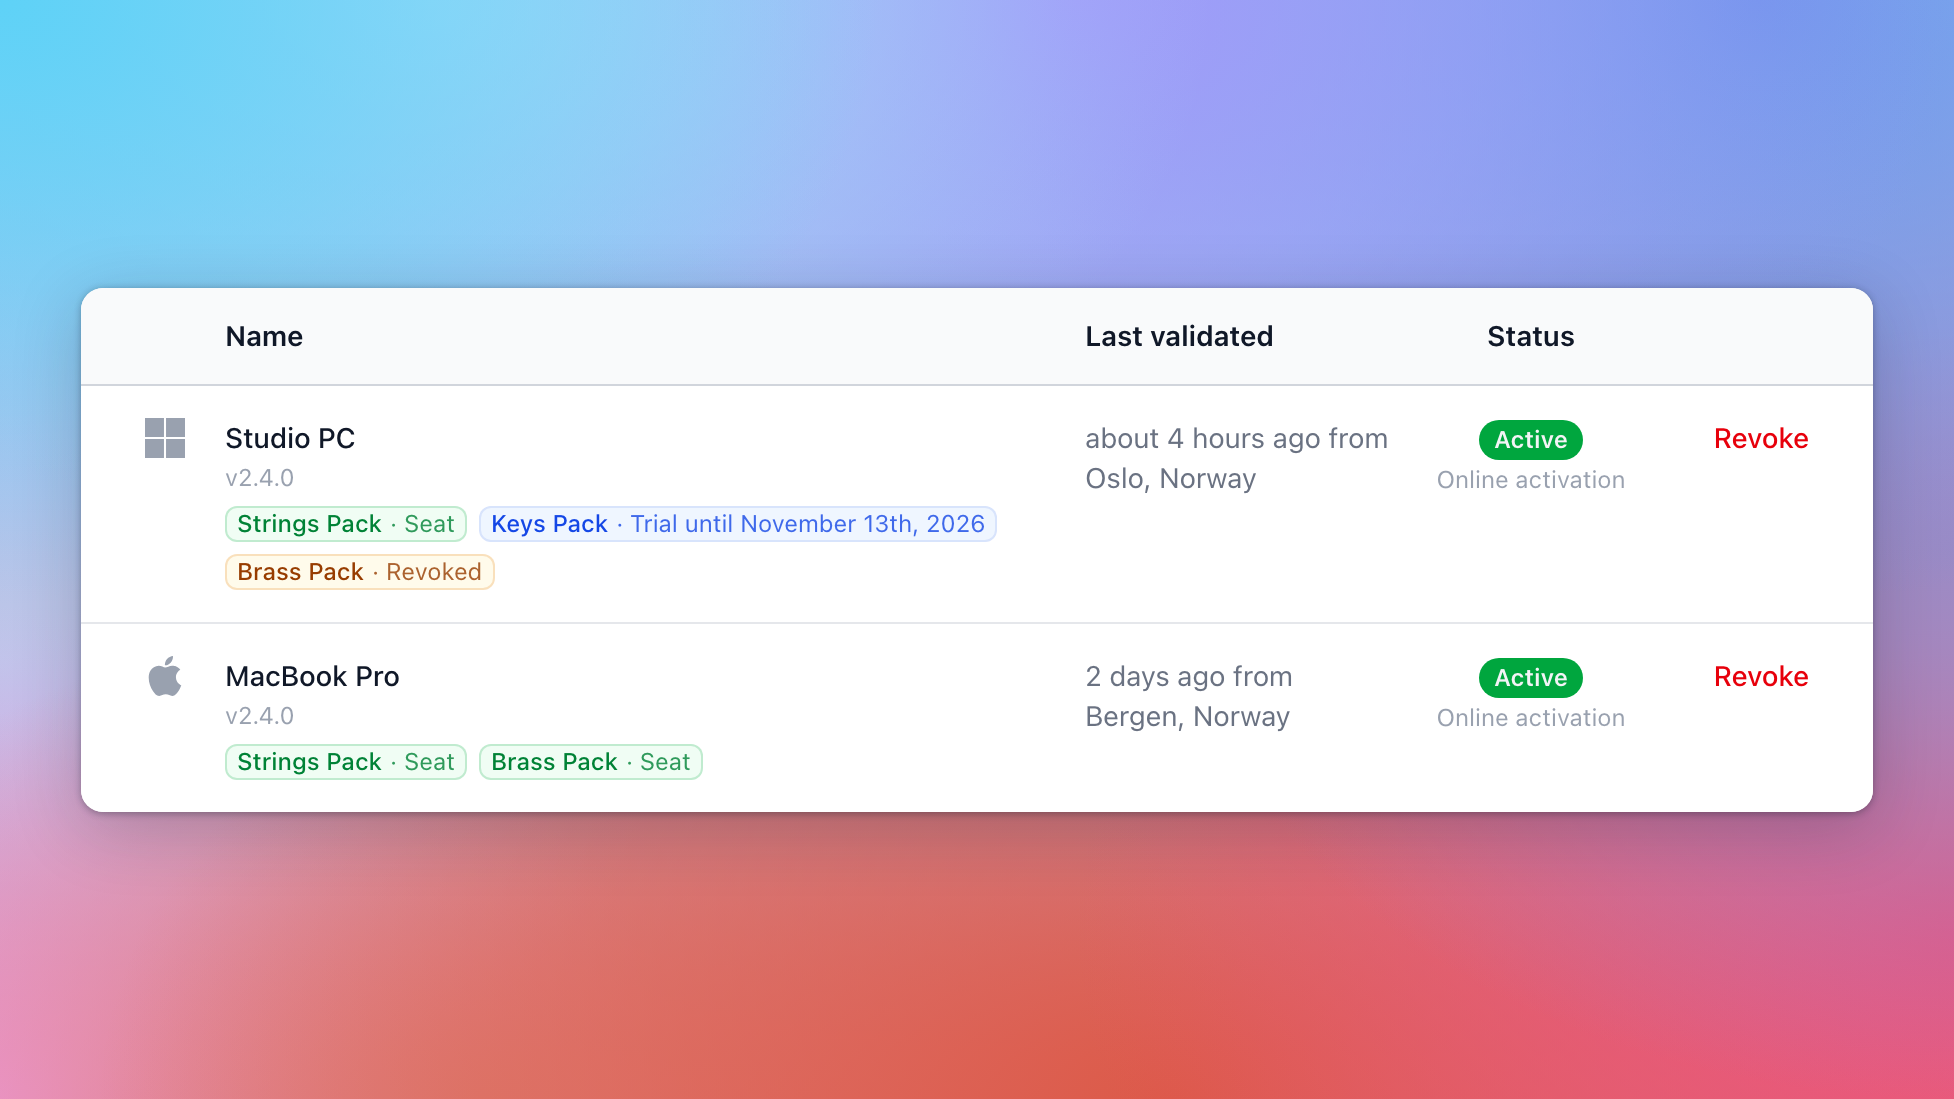
On a license of the parent product, each computer under Activations shows the add-ons it holds:
Seat: the computer holds a seat of the add-on. It links to the add-on's license.
Seat lapsed: the add-on's license or seat is no longer active.
Trial until a date, or Trial ended: a trial started from this license.
Revoked: the add-on was revoked on this computer on purpose (see below).
On the add-on's own license, each computer says which license of the parent holds its seat, for example With Aurora Synth on this computer.
Revoking the parent frees its add-on seats. Revoking a computer on the parent's license, or the whole license, also frees the add-on seats held there. When you revoke a computer, the confirmation says how many. Activating the parent there again takes them back. Add-on trials aren't affected.
Revoking just the add-on on a computer sticks. When you revoke a computer on the add-on's license, or the customer does it from Licenses in their account, your app stops unlocking the add-on there, and validating doesn't take the seat back. Your app can activate it again when the customer asks, if a seat is free. That's how a customer moves an add-on seat from one computer to another.
Revoking the add-on's whole license locks it on every computer.
When every seat is taken, a further computer that activates the parent still runs it, but the add-on stays locked there until the customer frees a seat or you add seats.
How customers buy a sub-product
Sub-products are sold through your storefront like any other product. There are a few common entry points:
Direct purchase link:
https://{your-account}.moonbase.sh/buy/{parent-id.child-id}drops the customer straight onto a checkout for the sub-product.Embedded storefront: If you've added the embedded storefront to your marketing site or to your product itself, sub-products show up in product listings just like top-level products, and the same cart and checkout intents work.
In-product upsell: Many merchants drop a "Buy" button next to a locked feature that fires the embedded storefront's checkout intent for the relevant sub-product. The customer never has to leave your product.
Your app's own list of add-ons: your app can show every add-on the customer can buy or try, with its price, and a Buy link to your checkout. See the next section.
Tip: If your parent product isn't itself for sale (for example, the baseline app is free and only the sub-products are paid), turn on auto-provisioning on the parent product (its Licensing section > Actions > Enable auto-provisioning). That way every customer automatically gets a parent-product license seat to activate against, so the sub-products they buy actually have a token to ride along in. Without a parent license, there's nothing to carry the sub-product list.
You can also grant a sub-product outside a purchase: with a voucher (see Vouchers), or by issuing a license yourself under Licenses > Create license (or Provision license on a customer's page).
Selling add-ons inside your app
Your app can ask Moonbase for the parent's add-ons, using the license or trial it holds, to build an in-app store or upgrade screen. Each add-on comes with its prices when it's for sale, whether the customer owns it, whether to unlock it on this computer, whether a trial can be started, and a Buy link that opens your store's checkout for it.
The list only shows add-ons the customer can do something with: ones they own or subscribe to, ones for sale, and ones whose trial they can start or are running on this computer. An add-on you only hand out with vouchers, campaigns or the API doesn't show unless the customer owns it, and a Private add-on shows only to customers who own it. Any add-on can be listed and bought this way, while trials need the add-on to be included in the main product's license.
If your app uses one of Moonbase's ready-made activation screens (the JUCE module, the Tauri plugin, or the Electron and Gorilla Engine modules), turn on its Add-ons screen with one setting. It lists the add-ons with Try free, Buy or Activate on each, and when the customer comes back to the app after buying one in the browser, it unlocks the new add-on.
What your product sees
This is the part that makes sub-products genuinely useful: you don't have to validate a separate license for every sub-product. Your product keeps validating the parent product's license, and the add-ons come with it, in two lists:
Owned add-ons: every add-on the customer owns under that parent, included in the license or not. In JWT-format licenses, this is the
sp:ownedclaim, a comma-joined string of child IDs. It says the customer owns the add-on, not whether it may run on this computer.Included add-ons: each add-on included in the main product's license that the customer owns or is trying, with whether your app may unlock it on this computer, and until when (the
spclaim). An owned add-on with every seat taken on other computers is listed but not unlocked.
Both contain only the child portion of the ID. So for a customer who owns acme-studio.pro-tools and acme-studio.cloud-sync, the owned list will be pro-tools,cloud-sync, not the full dotted IDs.
The official SDKs read both lists for you. For an included add-on, ask the SDK whether to unlock it (hasSubProduct("pro-tools"), or HasSubProduct in .NET), which checks the seat or trial on this computer and when it ends. For an add-on that works as a flag, check the owned list. The licensing API reference and each SDK's page in the developer docs cover the details, including how your app starts trials, takes seats and lists add-ons.
Included add-ons need a current SDK:
Node.js:
@moonbase.sh/licensing3.3.0 or later, and the Electron and Gorilla Engine modules built on it.NET: Moonbase.Net 4.3.0 or later
C++ and JUCE: moonbase-cpp 4.12.0 or later
Rust and Tauri: any version of the Rust SDK and the Tauri plugin
Apps built with an older SDK keep working and still see the owned list, but not seats or trials. The legacy JUCE client and legacy-format licenses don't support included add-ons.
By default, your app takes add-on seats whenever it activates or validates the parent. It can instead activate each add-on only when the customer asks for it, so the add-on uses seats only on the computers where the customer wants it.
Tip: Make sure your integration can re-validate the license token on demand, not only on startup. When a customer buys a sub-product while your product is already running, the license they have in hand doesn't yet know about the new purchase. A "Refresh license" control or an automatic re-validation right after a successful checkout lets the new sub-product take effect immediately, without requiring a restart or sign-out. The ready-made activation screens do this when the customer comes back to the app.
Adding new sub-products later
You can create more sub-products under the same parent at any time. The next time an existing customer's license is re-validated online, the token will include any new sub-products they've since purchased. No migration, no product update required beyond knowing what to do when a new child ID appears.
Gotchas
The sub-product lists only appear on the parent's license token. If you activate a sub-product on its own, that sub-product's token won't list other sub-products the customer owns. Authenticate against the parent to get the full picture.
Customers don't need to own the parent first. A customer can buy just a sub-product. They will, however, need to activate the parent product in your integration for the sub-product list to show up in a token, so make sure your activation flow targets the parent, not individual sub-products.
An included add-on's seats are its own. If the add-on allows fewer activations than the parent, it unlocks only on as many of the customer's computers as it has seats.
Offline licenses don't change. An offline license lists the add-ons as they were when the customer downloaded it, and add-on trials can't start from one. For an add-on bought later, the customer downloads a new license file.
Next steps
Create your first sub-product and run a test purchase end-to-end.
Decide whether each add-on is a flag on the parent's license or included in it. For an included add-on, set its number of activations, and turn on trials if customers should be able to try it.
Build your app with a current SDK, and turn on the Add-ons screen if you use one of Moonbase's ready-made activation screens. Check the SDK reference (or the generic license-validation docs for other languages) to see how the add-ons are exposed in your integration's code, and add on-demand license re-validation if you don't have it already.
If your parent product is meant to be free for everyone rather than a paid product, turn on auto-provisioning on the parent (its Licensing section > Actions > Enable auto-provisioning) so customers always have a license seat to validate against.
If you'd rather grant sub-products with codes or by hand, use a voucher (see Vouchers) or Licenses > Create license.
Was this helpful?
Still need help? Ask the team